

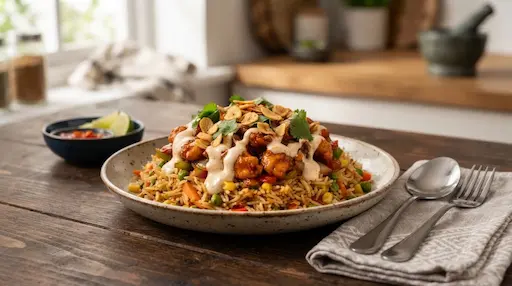
Are you craving a dish that perfectly blends savory chicken, seasoned noodles, perfectly cooked rice, and a tangy sauce? Look no further than the singaporean rice recipe by chef samina jalil. This unique dish has taken the culinary world by storm, especially in South Asian households. Despite its name, this recipe does not come from the streets of Singapore. Instead, it is a magnificent example of Pakistani fusion food that brings together multiple textures and flavor profiles in one spectacular platter.
Today, we will break down this complex-looking yet straightforward recipe. You will learn the history behind this famous dish, the exact ingredients needed for each layer, and the expert techniques popularized by Chef Samina Jalil. Therefore, whether you are hosting a grand dinner party or simply want to elevate your weekend family meal, this guide has everything you need.
The Origins: A True Pakistani Fusion Masterpiece
Before diving into the cooking process, it is fascinating to understand where this dish originated. The name “Singaporean Rice” is highly misleading. If you go to Singapore, you will find Hainanese Chicken Rice, but you will not find this specific layered delicacy. According to culinary historians and food bloggers, this dish was actually invented in Karachi, Pakistan.
“Don’t be misled by ‘Singaporean’ in the name. The dish never saw Singapore and has nothing to do with it… This dish originated from the hands of Karachi’s Bohra caterers somewhere in 2000-2002.”
During the early 2000s, wedding caterers wanted to create an exotic, one-dish meal that combined proteins and starches to enthrall wedding guests. As a result, they combined rice, Chinese-style chicken, noodles, and a spicy mayo topping. The exotic name was simply a marketing tactic to make the wedding menus sound more international and appealing. Over the years, experts like Chef Samina Jalil refined the recipe, bringing it from wedding halls directly into home kitchens.
Understanding the Four Essential Layers
The beauty of the singaporean rice recipe by chef samina jalil lies in its distinct layers. When serving, you must scoop deeply to get a bit of every component in a single bite. Here is a breakdown of the four main layers you will be preparing:
- The Base: Perfectly steamed long-grain basmati rice, often lightly seasoned.
- The Pasta: Stir-fried spaghetti or egg noodles tossed with crunchy vegetables.
- The Protein: A savory, slightly saucy Indo-Chinese style chicken and vegetable gravy.
- The Topping: A signature spicy mayonnaise sauce, finished with a sizzling tempering (baghaar) of crispy garlic and green chilies.
While making four different components might sound intimidating, the process is actually highly manageable if you prep your ingredients in advance. Proper preparation is the secret to executing this dish flawlessly.
Ingredients for the Complete Recipe
To recreate this masterpiece at home, you will need to gather ingredients for each specific layer. Below is the comprehensive list required for the authentic taste.
For the Rice Layer
- 2.5 cups long-grain Basmati rice (washed and soaked)
- 2 tablespoons cooking oil
- 1 teaspoon salt
- Optional: 1/2 teaspoon cumin seeds and 2 star anise for extra aroma
For the Noodle Layer
- 200 grams boiled spaghetti or egg noodles
- 1 cup julienned cabbage
- 1/2 cup julienned carrots
- 1/2 cup julienned capsicum (bell peppers)
- 1 tablespoon soy sauce
- 1 teaspoon black pepper and 1 teaspoon salt
- 1 tablespoon oil
For the Chicken Gravy Layer
- 1/2 kg boneless chicken (cut into small cubes)
- 1 tablespoon ginger-garlic paste
- 1/2 cup tomato ketchup
- 1 tablespoon hot sauce or chili garlic sauce
- 1 tablespoon soy sauce and 1 tablespoon vinegar
- 1 teaspoon red chili powder and 1/2 teaspoon black pepper
- 2 tablespoons cornflour (mixed with 3 tablespoons water to make a slurry)
- 1/4 cup oil
For the Signature Mayo Sauce and Garnish
- 1/2 cup high-quality mayonnaise
- 1/3 cup ketchup
- 1 teaspoon hot sauce
- A pinch of salt and black pepper
- Garnish (Baghaar): 3-4 fat cloves of garlic (sliced) and 4-6 green chilies (slit lengthwise) fried in 2 tablespoons of oil or butter.
Step-by-Step Cooking Instructions
Now that we have our ingredients prepared, let us move on to the cooking process. Following these steps sequentially will save you time and ensure everything is hot when you assemble the final dish.
Step 1: Preparing the Rice
First, wash the basmati rice thoroughly until the water runs clear. Soak it for about 15 minutes. In a large pot, heat the oil and add the cumin seeds and star anise if you are using them. Let them sizzle for 30 seconds. Add the soaked rice, salt, and enough water to boil. Cook until the rice is tender. Drain any excess water, cover the pot tightly, and let it steam on low heat (dum) for about 10 minutes. Set it aside.
Step 2: Boiling and Stir-Frying the Noodles
Boil the noodles according to the package instructions until they are al dente. Drain them and toss them with a few drops of oil to prevent sticking. Next, heat one tablespoon of oil in a wok. Toss in your julienned vegetables (carrots, cabbage, capsicum) and stir-fry them on high heat for two minutes. They should remain crunchy. Add the boiled noodles, soy sauce, black pepper, and salt. Mix well and set aside.
Step 3: Cooking the Chicken Gravy
This layer packs the most flavor. Heat the oil in a pan and add the ginger-garlic paste. Sauté lightly, then add the boneless chicken cubes. Cook until the chicken changes color and is fully cooked through. Next, add the salt, red chili powder, black pepper, soy sauce, and vinegar.
Mix everything thoroughly. Stir in the ketchup and hot sauce. Let the mixture simmer for a few minutes. To achieve that perfect restaurant-style thickness, slowly pour in the cornflour slurry while stirring continuously. Cook until the gravy thickens to a glossy consistency. Turn off the heat.
Step 4: Whisking the Mayo Sauce
The creamy sauce binds all the layers together. In a small mixing bowl, whisk together the mayonnaise, ketchup, hot sauce, salt, and black pepper. It should have a smooth, slightly pourable consistency. If it is too thick, you can thin it out with a tiny splash of water or milk.
Step 5: Preparing the Tempering (Baghaar)
In a small frying pan, heat 2 tablespoons of oil or butter. Add the sliced garlic and fry gently until it turns a light, crispy golden brown. Add the slit green chilies at the very end and fry for just 30 seconds. Be careful, as the chilies may sputter. Set this aromatic mixture aside.
The Grand Assembly
The presentation is just as important as the taste. Take a large, flat serving platter or a deep glass dish. Begin by spreading a thick, even layer of the prepared rice at the bottom. Next, evenly spread the stir-fried noodles and vegetables over the rice.
For the third layer, generously pour the hot chicken gravy over the noodles. Make sure the chicken is evenly distributed. Next, drizzle your prepared spicy mayo sauce all over the top. You can use a squeeze bottle to create an attractive zig-zag pattern.
Finally, pour the sizzling garlic and green chili tempering (baghaar) over the entire dish. The hot oil will slightly blister the mayo sauce, releasing an incredible aroma. Serve immediately.
Nutritional Profile and Calorie Breakdown
Because this dish combines multiple carbohydrate sources (rice and noodles) with a mayonnaise-based sauce, it is considered an indulgent meal. According to nutritional data for standard servings, one plate of Singaporean Rice contains roughly 667 calories. It provides a substantial amount of carbohydrates for energy, along with protein from the chicken. Due to its richness, it is best enjoyed as an occasional weekend treat or party centerpiece rather than a daily staple.
Pro Tips for Perfection
To truly master the singaporean rice recipe by chef samina jalil, keep these expert tips in mind:
- Do Not Overcook the Veggies: The vegetables in the noodle layer must retain their crunch to provide a texture contrast to the soft rice and noodles.
- Slice, Do Not Chop the Garlic: For the ultimate crispy garnish, slice the garlic thinly. Chopped garlic tends to burn too quickly and turn bitter.
- Make-Ahead Friendly: You can prepare the rice, noodles, chicken, and sauce a day in advance. Store them separately in the fridge. When it is time to serve, heat the components, assemble, and make fresh garlic tempering right at the end.
Conclusion
The singaporean rice recipe by chef samina jalil is a testament to the creativity of Pakistani cuisine. By merging traditional staples like rice and noodles with bold Indo-Chinese flavors and a creamy, tangy sauce, this dish offers an unforgettable dining experience. It is visually stunning, incredibly flavorful, and guaranteed to impress your family and friends.
Now that you know the secrets behind this iconic fusion dish, it is time to head to the kitchen. Gather your ingredients, follow the steps, and enjoy the magical layers of flavors. Have you tried making this at home? Let us know how your culinary adventure turned out!
Frequently Asked Questions
Is Singaporean Rice actually from Singapore?
No, despite its name, Singaporean Rice is a Pakistani fusion dish. It was invented by wedding caterers in Karachi, Pakistan, around the early 2000s to offer an exotic one-dish meal at large events.
Can I make Singaporean Rice ahead of time?
Yes, you can prepare the individual components (rice, noodles, chicken gravy, and mayo sauce) in advance. Keep them in separate containers in the refrigerator. Reheat them, assemble the layers, and add a fresh garlic tempering just before serving.
What can I use instead of chicken in this recipe?
While chicken is traditional, you can easily substitute it. Prawns are a fantastic alternative and cook very quickly. For a vegetarian option, you can use paneer (Indian cottage cheese), tofu, or simply increase the amount of stir-fried vegetables.
Why is my garlic tempering bitter?
Garlic turns bitter when it is overcooked or burned. To avoid this, slice the garlic thinly rather than mincing it. Fry it on medium-low heat and remove it from the heat as soon as it turns light golden, as it will continue to cook slightly in the hot oil.